Guide · September 18, 2026
How to Use the Pi Coding Agent in VS Code (With a GUI)
A practical walkthrough: install the pi CLI, add PiLot Studio, chat with the Pi coding agent inside VS Code, attach editor context, switch models, and manage packages — no terminal required.
The Pi coding agent is a terminal-first AI coding agent — powerful, but terminal-first. PiLot Studio wraps it in a full graphical interface inside VS Code: chat, session history, model switching, file context, voice input, and package management, all clickable. This guide walks through the complete setup in about five minutes.
1. Install the Pi CLI
PiLot Studio drives the official pi coding agent, so it must be on your machine first:
# macOS & Linux
curl -fsSL https://pi.dev/install.sh | sh

# Windows (PowerShell)
powershell -c "irm https://pi.dev/install.ps1 | iex"
Already installed? PiLot Studio auto-detects the binary — including versions managed by MISE — and can keep it updated for you.
2. Install PiLot Studio in VS Code
Open the Extensions panel, search for “PiLot Studio”, and install. It's free, open source (Apache-2.0), and available on both the VS Code Marketplace and Open VSX.
3. Bring a provider
Pi is BYOK (bring your own key). Export an API key — ANTHROPIC_API_KEY, OPENAI_API_KEY, GEMINI_API_KEY — or configure it in PiLot's settings panel. Running local models? Point Pi at Ollama or llama.cpp and skip the cloud entirely.
4. Open the GUI and start building
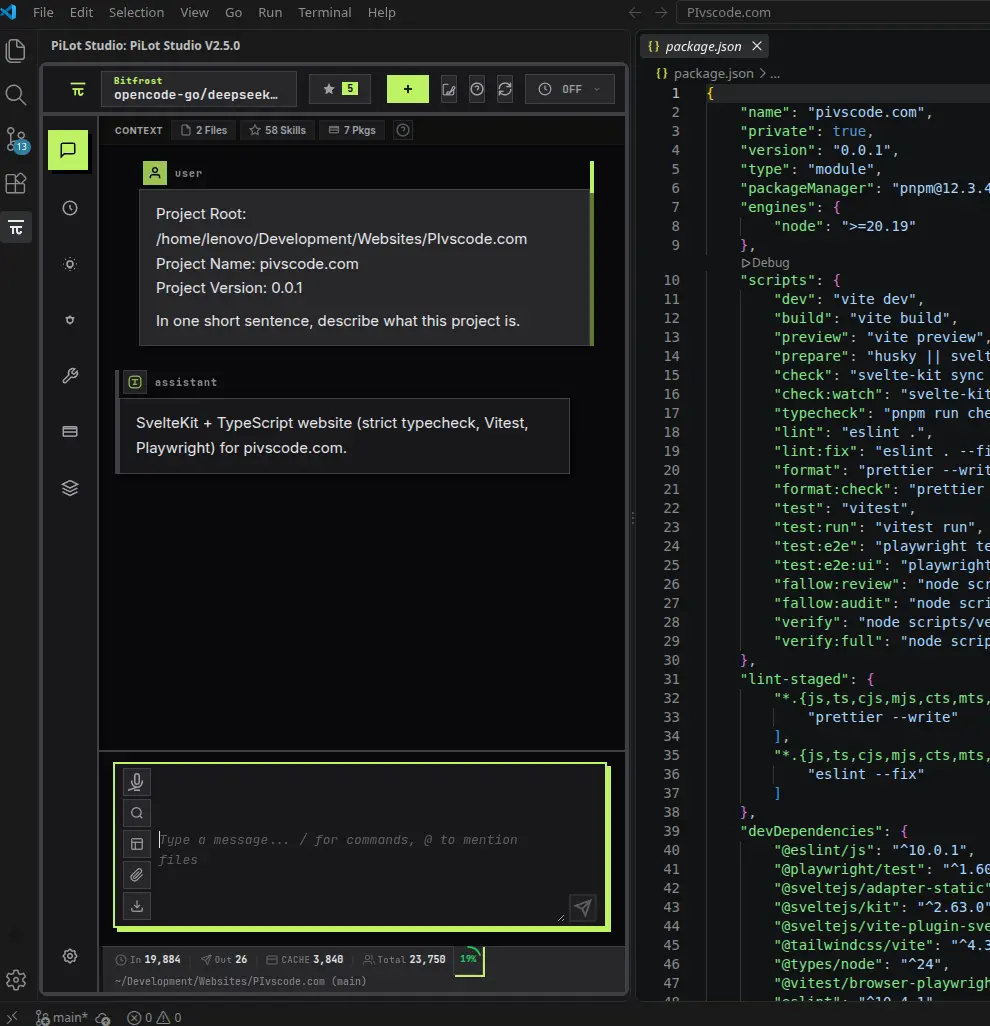
Press Ctrl+Shift+Alt+P (Cmd+Shift+Alt+P on macOS). The Pi coding agent opens as a side panel next to your code:
- Type a message — or use
/for slash commands and@to mention files. - Attach context — the paperclip adds files; right-click any editor selection and choose “Explain Code with PI”, “Refactor Code with PI”, or “Analyze Project with PI”.
- Switch models mid-conversation — the provider dropdown cycles between Claude, GPT, Gemini, Grok, and local models without losing your session.
- Dictate — the microphone enables voice input (Vosk-based, offline).
5. What you get in the panel

Everything the terminal agent does, visualized: a session tree for revisiting past conversations, token and cost meters per exchange, thinking-level control for reasoning models, and a Light Mode toggle that strips skills, extensions, and context files for a lean agent.
6. Extend with packages and skills
Open the command palette and run “Manage Resources” to install community packages and skills — or browse them visually from the panel's package tab. Skills teach the agent procedures; packages add tools. See Pi packages & skills for details.
Next steps
You now have the Pi coding agent running in VS Code without touching a terminal again. Explore what the Pi coding agent can do, or review the full install checklist.